Tuesday 6 December 2022

Different Deployments

 On top of the moans about scenarios, there are also moans about the standard deployment - 12" from Center line along the long table edge.

So muppet power to the rescue

Big note - although could be used for every scenario - some I would put a huge advantage on (looking at you Push and Invade)

The key part is for units to be set-up over 24" away from each other

Split Field Deployment

Square Dance Deployment

Encroached Deployment

Thin Edge of the Sword Deployment

Diagonally Deployment

Deep Strike Deployment


Some more Scenario Ideas

 Got thinking on some more Scenario ideas

Capture the Flag

Place 2 sets of 3 Loot Tokens 6 inches from the center line

Place 1 Central Objective Token in the middle of the table

You cannot pick up the loot tokens that were set up on your side of the table.
Ie Red player cannot pick-up Blue Tokens, Blue Player cannot pick-up red tokens
If a unit is killed in melee with a token, the token is dropped to the floor.

Objective is to grab the loot tokens from the other side of the table and return them to your deployment area

Victory Points are awarded at the end of the game as follows:
  • 1 Victory Point if you control the Central Objective Marker
  • 1 Victory Point for each Loot Counter you hold outside of your deployment area.
  • 2 Victory Points for each Loot Counter you hold inside of your deployment area.

Barren or Fertile lands

This scenario use 8 buff counters (each player has one 2, one 1 and two 0's) and a Loot Counter
The Loot Counter is placed in the exact centre of the board (or as close to it along the centre line as possible).
After rolling off to choose sides, roll off to see who places the first Bluff Counter. The players take it in turns to place one Bluff Counter of their choice (marked side down) fully on their opponent's half of the board, following the same placement restrictions as Objective Markers.

The Bluff Counters are treated as Loot Counters.

When a Player Picks up a Bluff Loot Counter, the value of it is then revealed to both players.

Victory Points are awarded at the end of the game as follows:
    • 1 Victory Point for the centre Loot Counter that you hold
    • 1 Victory Point for each Bluff Counter marked with a 1 that you hold
    • 2 Victory Points for each Bluff Counter marked with a 2 that you hold

    Bluff Counter marked with a 0 are not worth any VP.
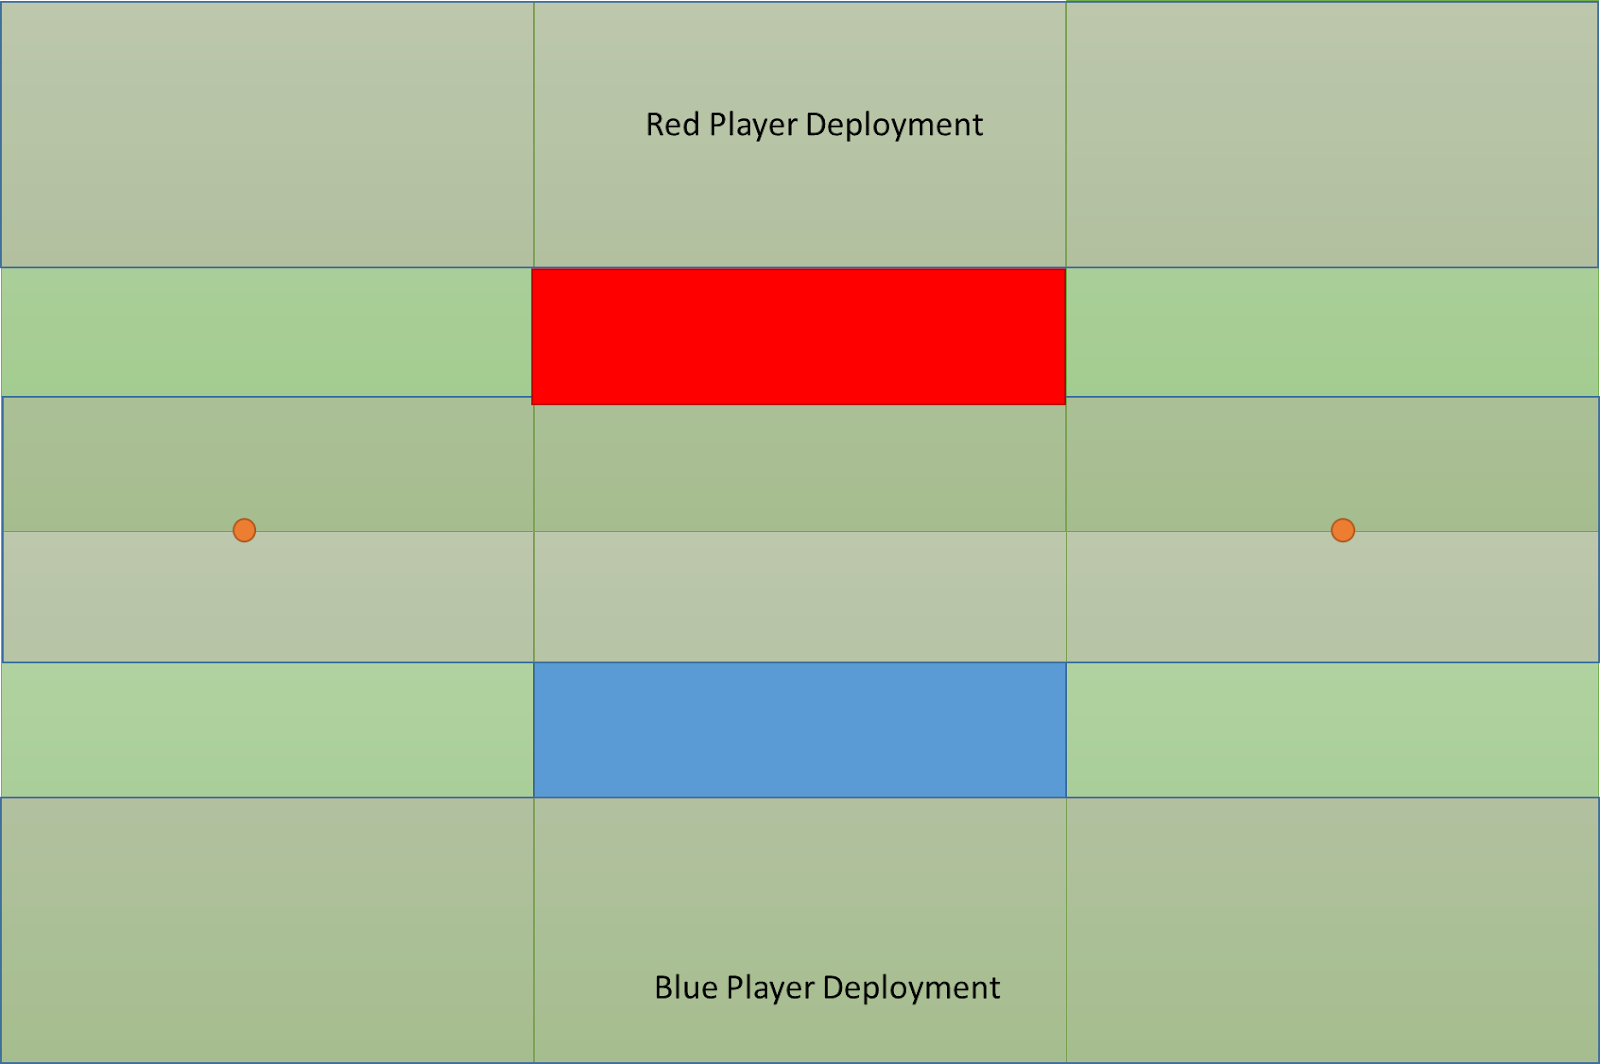
    Kill Zone

    Place 2 objective markers 12" from the table edge along the center line. Each Score 1VP for controlling it

    Kill zones are 24" from the table edge and the area between 6" and 12" from the center line
    Think of them as shrunken Middle Section Control Zones
    Box within the Middle 24" section, 12" from center line to 6" from Center Line (ie a 6" rectangle just outside the middle Deployment Zone are the Kill Zones
    One your side scores 2VP
    One Opponents Side scores 3VP


    Victory Points are awarded at the end of the game as follows:
      • 1 Victory Point for each Objective Marker you Control
      • 2 Victory Points for controlling the Kill zone on your side of the table
      • 3 Victory Points for controlling the Kill zone on the opposite side of the table

      Total Recall

      Three 3" radius scoring zones inside three 9" radius scoring zones.
      To score a zone the majority (more than 50% of the unit) must be within that zone.
      A unit cannot contest multiple zones, and if 50% straddling both zones then is counted as in the lower VP zone.
      A Zone is controlled by the highest Unit Strength in that zone. The table has a maximum of 9 available VP.
      2VP if majority inside the 3" zone (6" diameter)
      1VP if Majority within the 9" zone (18" diameter)
      Cannot use the same unit to score both zones, you are either in one or the other (If 50/50 between both, then the 1VP zone)


      Victory Points are awarded at the end of the game as follows:
        • 1 Victory Point for each 9" zone you Control
        • 2 Victory Points for each 3" zone you Control

        Scavenge revised

        Place one Objective Marker in the centre of the table. Then each player places one more Objective Marker on the centre line, rolling off to see who places theirs first.

        At the start of each player's turn, if they control one of the Objective Markers they may choose one of their non-wavering units controlling the objective to scavenge a Loot Counter. The unit receives a Loot counter and follows the normal rules for carrying Loot as per the Loot scenario. In this scenario, units may not carry more than one Loot Counter.

        If a unit Routs an enemy unit that is carrying Loot in melee, they may elect to destroy the Loot and remove it from the table rather than picking it up.

        Victory Points are awarded at the end of the game as follows:

        • 1 Victory Point for each Loot Token you hold.

        Balancing scenarios to 7 Victory Points available on the table

        Calculate Victory Points for each player and add together

        If equal to or less than 7 Victory Points, then convert to VP for each player

        If more than 7 Victory Points on the table at the end
        • If only one player scored more than 7 Victory Points then winner gets 7VP
        • If both players have Victory Points then work out the gap between Victory Points
          • If 0 gap then draw both gain 3VP
          • If 1 or 2 gap then winner gets 4VP and loser gets 3VP
          • If 3 or 4 gap then winner gets 5VP and loser gets 2VP
          • If 5 gap or more then winner gets 6VP and loser 1VP

        Friday 2 December 2022

        Scenario ideas


        I have over the years pondered about the scenarios
        With 12 scenarios split over 5 different styles of scenarios, it does get you thinking on what other scenarios there can be, that are balanced
        • Area
          • Control
          • Invade
          • Dominate
        • Token
          • Plunder
          • Push
          • Loot
        • Objective
          • Pillage
          • Raze
          • Salt the earth
        • Bluff Objective
          • Smoke and Mirrors
          • Fools Gold
        • Bounty
          • Kill
        So I created a new Area scenario which has been played at multiple tournaments (not just run by myself either) - Hold the Line, this got me thinking what others could be done.

        Area Scenarios

        Hold the Line

        The middle 12" (6" from each side from centre line scores)
         
        At the end of the game, divide the board into three 2'x1' rectangles
        straddling the centre line (6" from each side from centre line). 

        Add up the total Unit Strength of each player's units within a rectangle. If a unit is straddling the line between two rectangles it is considered to be in whichever rectangle is covered by the majority of its base. If there is no clear majority, the owning player must choose which rectangle the unit is in.

        The player who has the highest Unit Strength in each rectangle controls it.

        Victory Points are awarded at the end of the game as follows:
        • 3 Victory Points if you hold the rectangle in the middle.
        • 2 Victory Points for each other rectangle you hold.

        Double Domination or Hold the Flanks

        As per Dominate, but two 12" scoring zones set 12" from the the edges of the centre line

        Most Scoring Unit Strength overall wins


        Balancing issues
        See Balancing Dominate

        Bounty Scenarios

        Killing Fields

        Victory Points are awarded as follows:
        • Round 1: No Victory Points for routed units
        • Rounds 2-6: After each round add up the points cost of the routed enemy units this round and compare against the value of your own routed units, the person that scored the most gains 1 Victory Point, in event of a tie neither players gets a Victory Point for that round.
        • Round 7 (if rolled): No Victory Points for routed units
        • At end of game, add up the points cost of the routed enemy units. Your opponent does the same and you compare scores.
          • If the difference between the scores in favour of a player is 10% or more of the total cost of the army, that player gains 2 Victory Points i.e in a game with 2,000pts a side, a score difference of 200pts or more = 2 Victory Points

        Protect the Emissary - (Kill & Eliminate)

        Each player has a 50x50 Emissary (a blank base or model on that footprint will do).

        The objective is to get your Emissary over the half way line and keep it alive, while hunting down the opponents Emissary.

        Emissary is allied to the Army (so does not benefit from inspiring, auras etc)
        Speed 5, Defense 5, Melee 4+, Nerve 13/15, Height 2, Unit Strength 0, 1 Attack, Nimble, Inspiring Self

        Victory Points are awarded at the end of the game as follows:
        • 2 Victory Points for killing opponents Emissary unit in Melee phase or 1 Victory Point for killing opponents Emissary unit in Shooting phase
        • 1 Victory Point if your Emissary unit is still alive on your half of the board or 2 Victory Points if your Emissary unit is still alive on your opponents half of the board
        • Add up the points cost of the routed enemy units. Your opponent does the same and you compare scores.
          • If the difference between the scores in favour of a player is
            • 10% or more of the total cost of the army, that player gains 1 Victory Points,
            • if 20% or more 2 Victory Points, or
            • if 30% or more 3 Victory Points
            • i.e in a game with 2,000pts a side, a score difference of 200pts-399pts = 1 Victory Point, 400pts-599pts = 2 Victory Points, or 600pts or more = 3 Victory Points.

        Token Scenarios

        Gold Rush

        Before rolling off to choose sides:

        Place 7 Loot Counters on the board. The Players take it in turns to place one Loot Counter each. Roll off to see who places the first Loot Counter.

        Victory Points are awarded at the end of the game as follows:
        • 1 Victory Point for each Loot Counter you hold.

        Seek and Destroy

        Before rolling off to choose sides:

        Place 7 Loot Counters on the board. The Players take it in turns to place one Loot Counter each. Roll off to see who places the first Loot Counter.

        If a unit Routs an enemy unit that is carrying Loot in melee, they may elect to destroy the Loot and remove it from the table rather than picking it up.

        Victory Points are awarded at the end of the game as follows:
        • 1 Victory Point for each Loot Counter you control.

        Bluff Scenarios

        Everybody's Fool

        Same as Fools Gold, but the reveal is only at game end

        What would that take us to?

        If you added those, and prehaps brought back some others, then you could expand the 12 scenarios to 20

        Monday 7 November 2022

        Tournament Scoring Systems - So what's the difference and why?

         A chunk of change load of us play in tournaments and/or leagues, so you would think there is a unified scoring system used by all Kings of War players.

        Right?

        Right!

        WRONG

        and that's great.

        Sorry wait, what, why?

        Yer you heard myself (talking to myself, again. really should stop that, but then who would respond when the voices start?), it is great there are different systems as each system gives weight to what that system and the TO want to drive at in their tournament.

        Lets take it back a bit. 

        Why have a system at all?

        A Tournament system is there to work out the pairings as the rounds progress and to determine the final winner, and without a system it is chaos and if its chaos you may as well be in Margate the shell suit twin of Blackpool.

        The fundamentals of a scoring system.

        The Tournament points are made up of some of the following:

        • 0 to n points for Result (Win, loss, draw)
        • 0 to n points for Scenario Points scored
        • 0 to n points for Kills
        • 0 to n points for difference in Scenario Points scored (Scenario point attrition)
        • 0 to n points for difference in Kills (Kill attrition)

        These are either kept separate or some of them combined into Tournament Points.

        For equal scores then deciders are done

        1. Number of Wins
        2. Scenario Points scored
        3. Actual Kills points
        4. Difference in Scenario Points scored (Scenario point attrition)
        5. Difference in Actual Kills (Actual Kill attrition)
        6. Tournament Special Characters Survived
        7. Tournament Special Characters Killed

        With deciders removed for those parts that were already combined into tournament points.

        For example if you used for TP:

        • 0 to n points for Result (Win, loss, draw)
        • 0 to n points for difference in Scenario Points scored (Scenario point attrition)
        • 0 to n points for difference in Kills (Kill attrition)
        Then deciders would be:
        1. Scenario Points scored
        2. Actual Kills points
        3. Tournament Special Characters Survived
        4. Tournament Special Characters Killed

        OK, so they score different, so what

        Well from this mix of tournament systems (there are others but they basically follow the same format), you have:

        So what is the best system?

        That's the million dollar question, and there is not one "best" system.
        Want the person who won the most games to win the tournament - Herts & Reaper Scoring System, but without the combined TP some players find it difficult to track progress as dependent on the deciders and tracking those.
        Want scenarios to lead the march - Bullshroud Scoring System
        Want players to always be able to strive for more points - Northern Kings Scoring System
        Want the seesaw scoring of positive and negative scoring - Blackjack Scoring System

        Others are variations of these